10 Steps To Install A FREE SSL On WordPress
In this article we will discuss the implementation of a FREE SSL on WordPress sites. Click here to skip ahead to the 10 step tutorial.
Lately, in the news, cyber security is always in the headlines even though it’s always been an issue. You wouldn’t shout out your credit card information or your social security number in a crowded room; right?! You probably wouldn’t even yell out your home address yet many of us enter personal details into forms or log into websites without an SSL encrypting our information. Perhaps many of us feel that it isn’t really possible to harvest that information out of an un-encrypted message but, as a culture, we are starting to realize how important online security is, FINALLY!
Web developers should understand the importance of an SSL more than most. However, developers often struggle to convince their customers to see the value in additional costs to their project when “their site works fine” without it. I personally have struggled with the sales aspect myself and have worked to find a cost effective solution. My call to action came in the form of a Google Security Blog. The (now) well known article discloses that an upcoming version of Google Chrome will “shout out” that pages without and SSL are “Not secure” in bold red lettering in the address bar. That’s the last thing any website owner wants their users to see.
So, let’s begin getting your FREE SSL on WordPress!
Upgrade your website speed and security for Free!
My customers know I am a big fan of CloudFlare. Ironically, they are having issues for the first time since I’ve used them while writing this :/ but that’s the web 😉
With CloudFlare, I’ve consistently seen website speed boosts of about 350 ms with proper configuration. That’s a website loading 1/3 of a second faster than without the service!
One day, when testing the SSL settings with a certificate that I installed on my server from GoDaddy, I realized that CloudFlare offers a free “shared Cloudflare Universal SSL certificate” with their free plans. WOW, that is pretty awesome! Now the shared certificate is limited, but you do have the option of buying a dedicated certificate through them as well. I also encourage users of the free plan to consider the CloudFlare Pro plan for only $20/month. It’s worth it for just their Polish and Mirage features!
Shared SSL Limitations
Although this feature is awesome, It’s important too to realize the limitations of this type of SSL. All that the CloudFlare shared SSL encrypts is the connection between the user and CloudFlare’s server. Since you don’t have an SSL on your website’s server, the connection between CloudFlare and your website server is still http. This is still WAY better than having a non-secure connection through the whole chain. I only recommend the use this type of SSL when there are budget constraints. I would recommend using a regular (server installed) dedicated SSL certificate on business sites. A good use of this type of SSL is a personal blog. You can always upgrade later.
Now that I have thoroughly plugged CloudFlare and have disclosed the limitation, let’s move on to getting your free SSL on WordPress, compliments of CloudFlare…
10 Steps to Adding a FREE SSL on WordPress
#1 Rule: Make sure you have a backup
What’s the worst thing you can do as a developer?… Work on something you haven’t done before without a backup.
Treading into unknown territory without an escape plan = Not a smart idea.
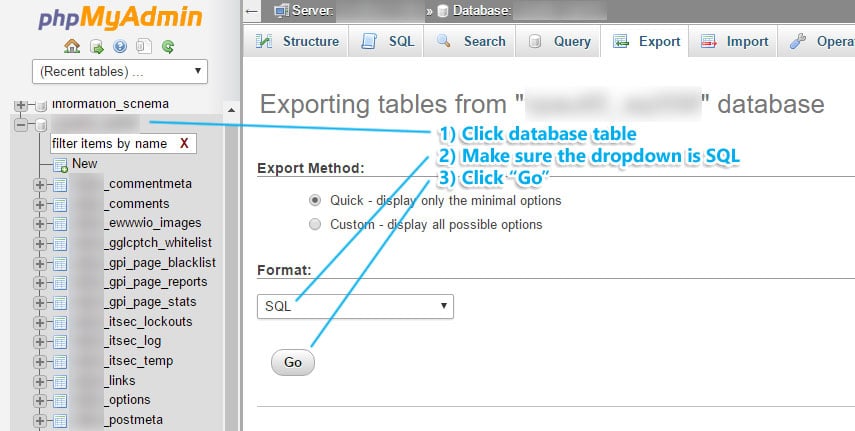
Things NEVER go as planned, even if I write this detailed to the point that it can’t be misunderstood, something inevitably WILL GO WRONG. If you have a backup program, use it… If you use dedicated WordPress hosting like WP engine, backup before starting or, if nothing else, go into phpMyAdmin and export a *.sql file of your full database.
Below is a graphic for reference:
IMPORTANT: There’s one other part to this that most people forget. KNOW HOW TO RESTORE THE SITE FROM YOUR BACKUP. Having a backup doesn’t help if you have no clue how to restore it. If you haven’t already, practice on a test site in the same development environment. It will give you some piece of mind moving forward.
If you created a backup in phpMyAdmin, importing (restoring) is just as easy. Simply right click your SQL file (in Windows), compress your file (“Send to… Compressed (zipped) folder”, click on the “Import” tab in phpMyAdmin. Choose your newly compressed folder of the .sql file and click upload.
Step #2: Have your CloudFlare account for more than 24 hours
If you don’t have an account already, create a CloudFlare account. CloudFlare offers DNS, Content Delivery (CDN)and web security services with an added free shared SSL.
NOTE: This is all you have to do to get your FREE SSL. The following steps will help guide the installation of your FREE SSL on WordPress.
Create your account and add your website to that account. CloudFlare will then guide you with the nameserver setup.
DNS propagation goes very fast nowadays but as a general rule, allow yourself 24 hours after switching your nameservers to CloudFlare. This also allows the shared SSL to be consistent on your site after you switch.
[vpt_adspace]
Step #3: WordPress Prep
There are a couple things I like to do in WordPress before starting the process. It helps prevent possible issues with files being locked down, having to look information up, etc. When you are in the middle of a mess, the last thing you want is a simple thing compounding the difficulty. This basic step prepares you for things that can (and will) go wrong.
Here are the recommended actions of this step:
- Disable reCAPTCHAs: reCAPTCHAs can make for issues when trying to log in via https the first time. A reCAPTCHA is usually added via a plugin that has been installed. Simply deactivate that plugin for the time being. You could also disable any other unnecessary plugins just in case. Use your discretion on a case by case scenario.
- Reset Password: You should change your password regularly but this is a good time to go into your user account and create a new password. Copy that password into NotePad or a different program so it’s at the ready.
- ***Add Really Simple SSL plugin ***. This is the most important action at this step. However, DO NOT ACTIVATE at this stage yet.
Step #4: Make sure file permissions are writable for .htaccess and wp-config.php
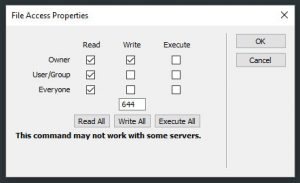 In the process of switching your site over to HTTPS, the Really Simple SSL plugin (or any other SSL plugin) needs to write to the .htaccess file to place a RewriteRule in the file and add some code to wp-config.php. Some security plugins however, automatically set file permissions to un-writable (444) to prevent hackers from doing bad things to your site. This will also prevent the plugin from writing the code it needs to.
You can check/change your file permissions by using a FTP program like Dreamweaver (if your server allows) or use the File Manager in cPanel. In either case, you right click the htaccess or wp-config.php file and look for a menu item like “Set Permissions…” or “Change Permissions”. 644, 640 or 600 is writable.
NOTE: After you have activated the Really Simple SSL plugin, I would recommend setting permission for both the .htaccess and wp-config.php files to 444 in step 9. Remember that you did this. At some point you may have to change that again for another plugin that needs to write to these files.
Step #5: Get logged into the database
Although not a necessary step, having the database on the ready helps if there are issues and also helps if you need to troubleshoot. Go back to step one, if you haven’t made a backup already, you have one last chance to do it now in phpMyAdmin.
⚠ THIS IS YOUR LAST WARNING ABOUT A DATABASE BACKUP ⚠
If you haven’t done a backup, Return to Step 1
Step #6: Log in via HTTPS
If CloudFlare has the shared SSL ready, you will be able to type “https://(yourwebsite).com” into the address bar and you won’t get a connection error. As mentioned before, you don’t have to do anything to initiate this, CloudFlare does that automatically. The following instructions, however, help you configure the FREE SSL on WordPress.
The site may appear messed up as some resources are being blocked or not served up properly at this point. Generally, this is what you call mixed content errors. Don’t sweat this at this point, the Really Simple SSL plugin should take care of most (if not all) mixed content errors.
Go to your secure login page and login. This is now your usual login page with the “https” added. Example: https://(yourwebsite).com/wp-login.php.
Hopefully, you will be able to get into the site without a redirect loop. If there is a redirect loop, the dashboard will take too long to load and will eventually time out and will give you an error message. In that case, try going into the wp_options table and change the “siteurl” and “home” to https. These are the first two lines of the wp_options database table. For those of you not familiar on how to change that, simply click on that table in phpMyAdmin, double click the cell you want to change (in this case the siteurl and home URLs), make your change and click off of that area. Your change will be saved to the database.
NOTE: If you can’t figure out how to get in via HTTPS, you may have to consider aborting this tutorial and finding another professional to help you.
[vpt_adspace]
Step #7: Enable SSL plugin to use the FREE SSL on WordPress
This is where the magic happens. Remember in step 3 we told you to install but NOT activate the Really Simple SSL plugin? Here is where we activate it. It’s entirely possible you are seeing your formatting on the backend of the WordPress site all messed up at this stage. No worries, once this plugin is enabled it will fix all of that. Once you activate the plugin you will see the message below:
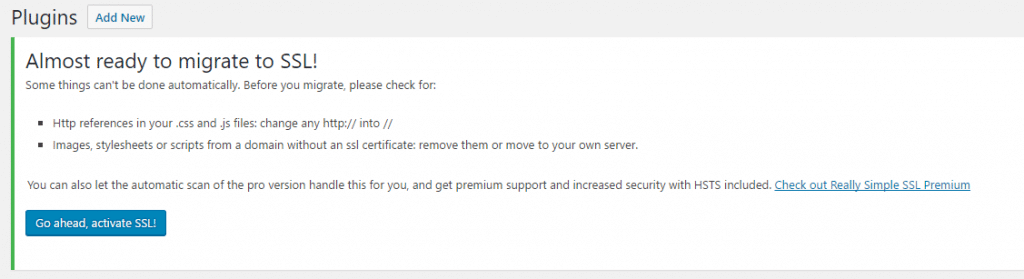
Once you click that blue “Go ahead, activate SSL!” button, your site will have the necessary code added to .htaccess and wp-config.php to redirect your site to the secured domain. Your FREE SSL on WordPress is now officially installed and configured!!!… Slightly.
For whatever reason, if you fail at this stage, pay attention to the errors you get. Errors give valuable clues to what’s wrong with your configuration. If all else fails, you have that backup to revert to.
NOTE: If you are in phpMyAdmin, you will now notice that the siteurl and home are set to the HTTPS version of your site now in the wp_options table.
Step #8: Work out the mixed content errors
![]() So you made it to step 8, great, you have your site using the FREE SSL on WordPress and all traffic is directing to the HTTPS version! It is almost 100% guaranteed that the site won’t be without some mixed content errors though. No biggie, we discuss how to resolve these nuisance errors in short order.
So you made it to step 8, great, you have your site using the FREE SSL on WordPress and all traffic is directing to the HTTPS version! It is almost 100% guaranteed that the site won’t be without some mixed content errors though. No biggie, we discuss how to resolve these nuisance errors in short order.
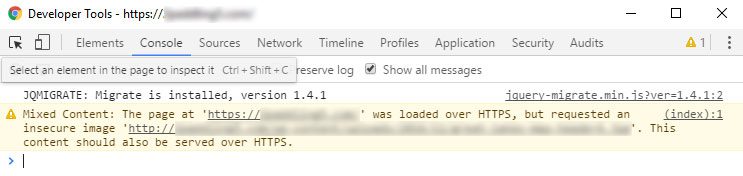
First off, how do you determine that you have mixed content errors from adding the FREE SSL on WordPress? You will probably see missing images or bad formatting on the site. To know for sure, look at the address bar. Are you seeing https gray with an “i” circled or are you seeing https in green with the padlock. If it’s not green with the padlock, there is some content trying to display over http instead of https. You can also look inside your Google Chrome Developer Tool Console and that will give you more specifics:
Follow these steps to fix mixed content errors from installing the FREE SSL on WordPress:
- Start with clearing the cache and re-saving Permalinks: Sometimes images and stylesheets are stubborn. They get cached on the origin server, CloudFlare’s server or other servers along the way. Re-save Permalinks (Settings -> Permalinks), clear your caching plugin and “Purge Everything” on the cache tab of CloudFlare.
- Re-Save your theme: Go into Appearance -> Customize and “Save & Publish” your theme. Chances are the element that is being stubborn is in the site template (i.e. the logo, background or a footer graphic). Go to that specific element (if possible) and redo that link; then “Save & Publish”.
- If you are using a visual editor and the mixed content is page specific, go into that specific page and relink/save that element.
- Flush your browser cache: If you’re noticing it on your computer, it doesn’t always mean that it’s that way with the site. Hold Ctrl + F5 on your browser to clear browser cache. If that doesn’t work, try using a program like CCleaner to clear cache and flush your DNS. You can also try flushing your DNS in CMD Prompt by typing “ipconfig /flushdns”. NOTE: Flushing DNS only really helps if your computer is getting it’s DNS from your old registrar as opposed to CloudFlare.
Step #9: Reverse steps 3 and 4
When you finish a complicated or hard task it’s natural to want and breath a sigh of relief and celebrate too soon. Forgetting about settings that need to set back to their original state is a common mistake. Remember in steps 3 and 4 we introduced some security vulnerabilities in order to make this process easier. Be sure to re-enable your reCAPTCHAs and lock down your file permissions after you’re done. If you’ve disabled any other plugin prior to this, re-enable them.
Step #10: Test, test, test and more testing…
Never assume anything works. Always test ALL features of a website before calling it “done”. Use Google Chrome’s Developer Tool Console (or other tools) to look and make sure that nothing is being blocked and there are no errors present. Also, nothing beats running a live test of web forms and live transactions to make sure that your customer is receiving website messages and orders. This attention to detail is what separates pro developers from amateurs.
Happy coding!
If you have any questions or comments then please leave a reply below else, thank you for reading.
If you would like to contract vPaulTech LLC to install this service, please fill out our contact form below.